1. Home
  2. Hiring a Mason
Before you hire anybody

10 Reasons to Always Hire a Qualified Mason

Bad masonry almost never looks bad the day it's finished, on a repair or on brand-new work. It shows up a few winters later, when mortar falls out in chunks, brick starts flaking, stone comes off the wall, or a wall starts to lean. These are the mistakes I find over and over, what each one looks like, and how the work should have been done.

Planning a new chimney, a fireplace, a stone front on the house, a retaining wall or a set of brick pillars? Read this before you hire anybody. Most of what goes wrong with new masonry is buried where you'll never see it: the footing, the steel, the water barrier, the clearance at the bottom.

Fixing other people's work, new and old, is a big part of my living. Too often it was done by somebody who added masonry to another trade, or learned it from online videos. It looked fine the day they left.

Masonry doesn't fail on day one. It fails a few freeze and thaw cycles later, after the check has cleared. By then you're paying for the job twice, and the second time often costs more, because the first one did damage of its own.

A qualified mason usually costs more up front. Not because he charges more, but because he's doing more. Nearly all of the difference is in the part you can't see.

I offer a workmanship warranty because I know the work is done right the first time.

1. Mortar falling out in chunks

Good mortar wears away slowly, a little at a time, over decades. When a repair comes out in whole chunks, the joints were never prepared to hold it.

What poor work looks like

  • New mortar coming out in clean, whole pieces within a few seasons of the repair.
  • Chunks with a flat, smooth back. That's what mortar looks like when the joint behind it was cut too shallow, or not cut at all.
  • Hairline cracks along the edges of the joints, where mortar packed in one thick pass shrank away from the brick.

How it should be done

  • Old mortar cut out to two to two and a half times the width of the joint. On a 3/8 inch joint, that's 3/4 to 1 inch deep.
  • Dust cleaned out and the joint dampened before any new mortar goes in.
  • New mortar packed in thin layers, about a quarter inch at a time, each one firm before the next. Thin layers cure evenly instead of shrinking away from the back of the joint.
  • The last layer tooled when it's thumbprint hard, so the joint is dense and sheds water.

Sources: National Park Service, Preservation Brief 2 and Brick Industry Association, Technical Notes 46

More on this: Why is mortar falling out of my chimney or brickwork in large chunks?
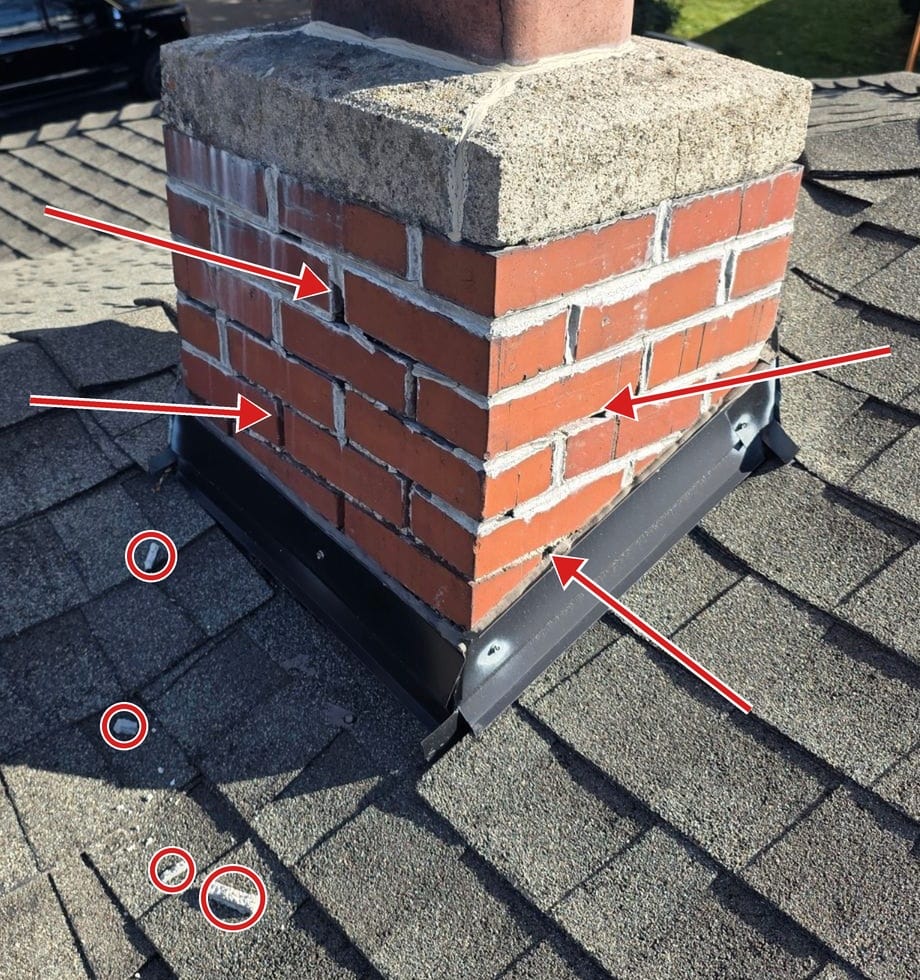
A brick chimney on a shingle roof with open mortar joints marked by red arrows, and loose chunks of mortar circled in red on the roof below it
The chunks circled on the roof came out of the open joints the arrows point to.

2. Mortar smeared across the brick

A mason who knows the trade keeps mortar in the joint. Smear across the face of the brick is one of the easiest signs of poor work to spot, often right from the sidewalk.

What poor work looks like

  • A gray film or ridges of mortar across the brick faces, past the edges of the joints.
  • Joints that look wider and messier than the brick pattern underneath them.
  • Bleached, streaked or pitted brick where somebody tried to clean the smear off with strong acid or a pressure washer.
  • Smear that's been on the brick more than a week or so. By then it's close to impossible to remove, and after 28 days, once the cement has fully cured, it's impossible.

How it should be done

  • Mortar kept in the joint, tooled clean, and the excess brushed off the brick before it hardens. Cleanup happens as the work goes, not weeks later.
  • When smear does need cleaning, the gentlest method that works. The brick industry warns against unbuffered muriatic acid and high-pressure water on brickwork.

Sources: National Park Service, Preservation Brief 2 and Brick Industry Association, Technical Notes 20

More on this: Why is there mortar smeared on the face of my bricks?

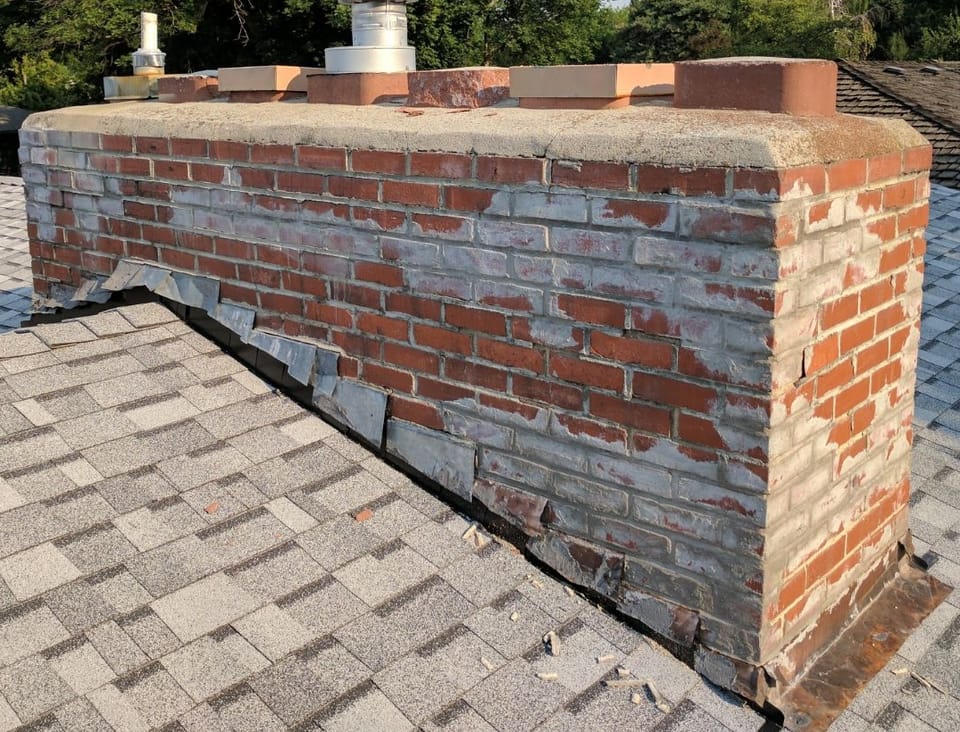
A long brick chimney on a shingle roof with gray mortar smeared across most of the brick faces
Mortar smeared across the brick faces, well past the edges of the joints.

3. Covering the old joints instead of fixing them

Fresh mortar, stucco or caulk goes over the old joints, and nothing gets cut out first. It will probably last about a year.

What poor work looks like

  • A thin layer of mortar sitting on top of the old joints, often wider than the joints themselves.
  • Edges peeling or flaking away, with the old crumbling mortar showing underneath.
  • Stucco troweled over a whole chimney, coming off in large sheets with the damaged brick still underneath.
  • Caulk or sealant run over the mortar joints. Same shortcut, out of a tube, and within minutes of going on it's impossible to get off the brick.

How it should be done

  • The failed mortar comes out before anything new goes in. There's no version of repointing that skips that step.
  • Sealant kept to the places it belongs: movement joints, where brick meets a window or door frame, and small cracks in a chimney cap. A mortar joint in a brick wall isn't one of them.

Sources: National Park Service, Preservation Brief 2 and Brick Industry Association, Technical Notes 46

More on this: Why is mortar falling out of my chimney or brickwork in large chunks? Why is there mortar smeared on the face of my bricks?
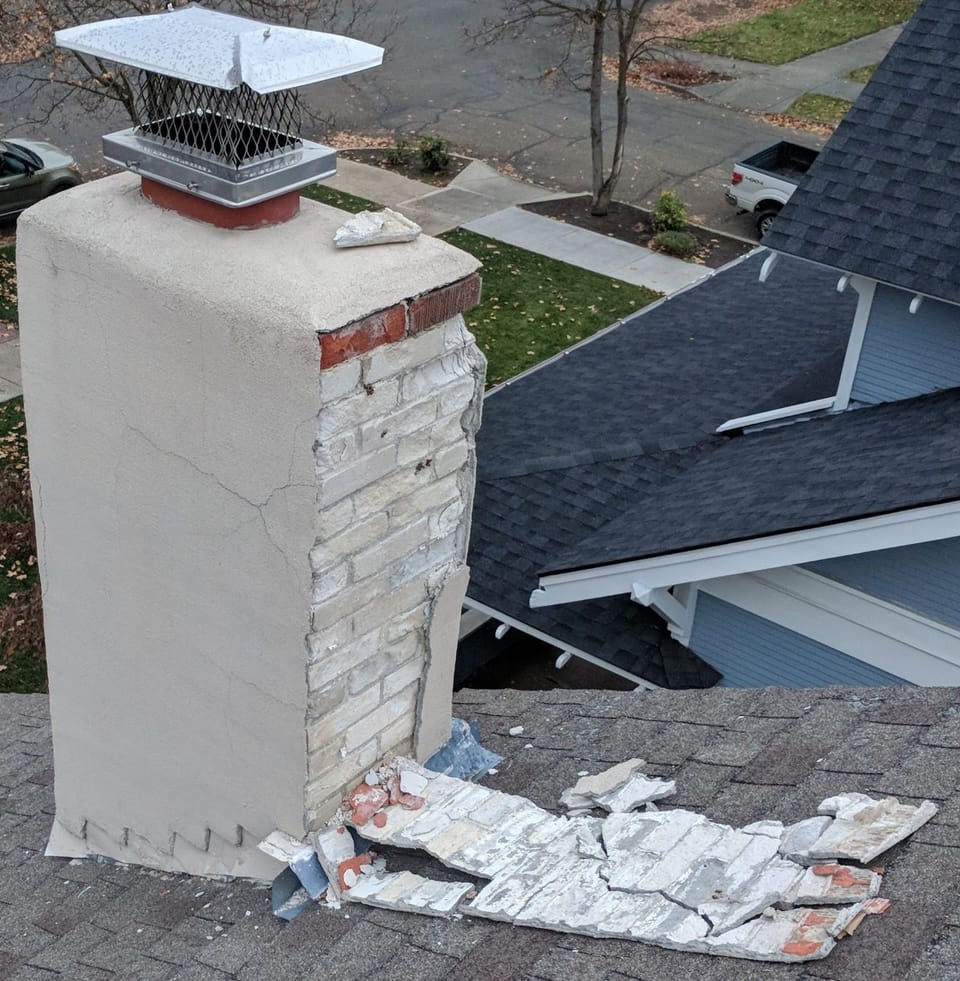
A stuccoed chimney on a roof with one side of the stucco fallen away in large sheets, exposing crumbling brick, and the broken sheets lying on the shingles
A stucco "fix" over a chimney, coming off in full sheets with the damaged brick still underneath.
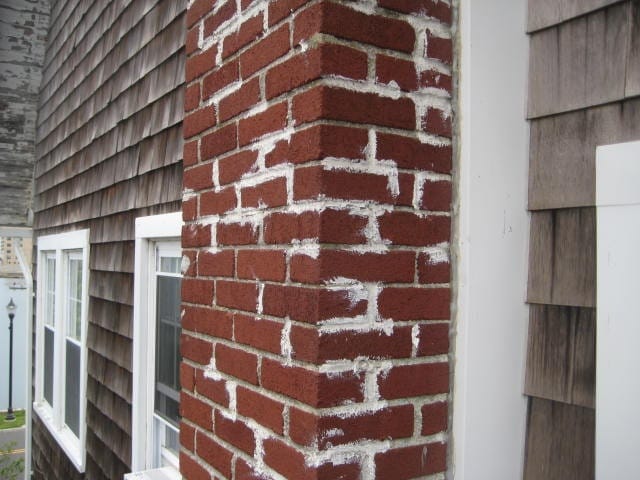
A brick column beside a shingled wall with white caulk smeared into and across the mortar joints
Mortar joints "repaired" with caulk. Once it's on the brick, it doesn't come off.

4. Mortar harder than the brick

Stronger isn't better here. A wall moves a little with every season, and the mortar is supposed to be the part that gives. When the mortar is harder than the brick, the brick gives instead.

What poor work looks like

  • Brick faces cracking or flaking off right along a newer repair, while the new mortar looks fine.
  • Hard, bright gray mortar packed into an old wall of soft brick.

How it should be done

  • Repointing mortar softer than the brick, and no stronger than the original mortar. The Park Service and the brick industry both say so plainly.
  • A mix chosen for the wall, not whatever's in the truck. Older, softer brick usually calls for a softer mix with more lime in it.

Sources: National Park Service, Preservation Brief 2 and Brick Industry Association, Technical Notes 46

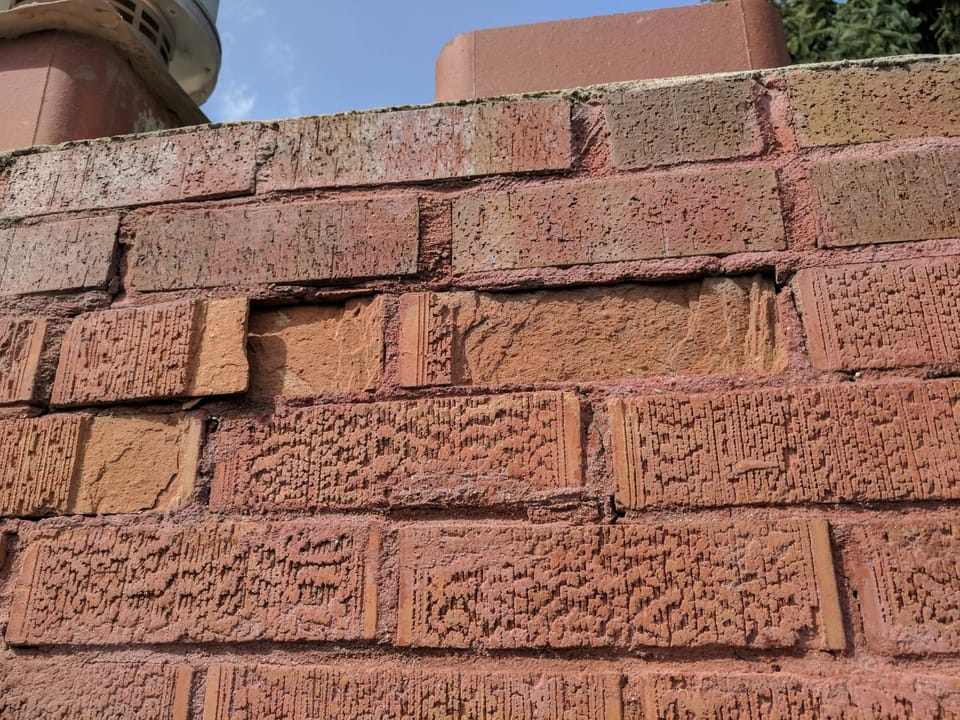
Close-up of the top rows of a brick chimney where the faces of several bricks have flaked away
Spalled brick near the top of a chimney. A missing drip edge and the wrong repair mortar both cause this, and the damage looks the same. On this chimney, the wrong mortar was likely the main cause.

5. A chimney cap with no drip edge

The top of a chimney is what keeps water out of it. In the trade it's called a crown. Without an edge that sticks out past the brick, rain runs straight down the face instead of dripping clear.

What poor work looks like

  • A cap that stops flush with the brick, or thins out to a feathered edge.
  • Brick flaking or crumbling in the top few rows, right under the cap. It looks the same as the damage the wrong mortar does, shown under reason 4.
  • A thin cap cracked through after only a few winters.

How it should be done

  • A cast crown that projects past the brick with a drip edge underneath. The Brick Industry Association puts it at two inches minimum in Technical Notes 19B, and says not to feather it out to the edge.
  • Where a cap can't overhang, the top rows of brick stepped out to form the drip instead.

Sources: Brick Industry Association, Technical Notes 19B

More on this: Why is the brick on my chimney cracking or flaking near the top? My chimney cap has small cracks. Does it need to be replaced?

6. A heavy concrete cap poured over an old chimney

A big slab of concrete poured over the top of an old chimney is more common than it should be. It usually causes more problems than it solves.

What poor work looks like

  • A thick block of concrete sitting on the chimney, often hanging well past the brick.
  • Cracks through the slab, with stains or loose brick below it.
  • A heavy cap cracked clean through within its first year. It was overkill to begin with, and it shows how easily that kind of cap cracks.

How it should be done

  • A crown sized and shaped for the chimney, reinforced, with a drip edge, and with a break between the crown and the brick so the two can move separately.
  • An honest look before anybody pours one. Getting a heavy cap back off takes so much force that replacing it, and fixing the brick under it, will likely damage many more rows of brick. That can turn a repair into a rebuild.

Sources: Brick Industry Association, Technical Notes 19B

More on this: My chimney has a huge concrete cap. Should it be removed or repaired? My chimney cap has small cracks. Does it need to be replaced?

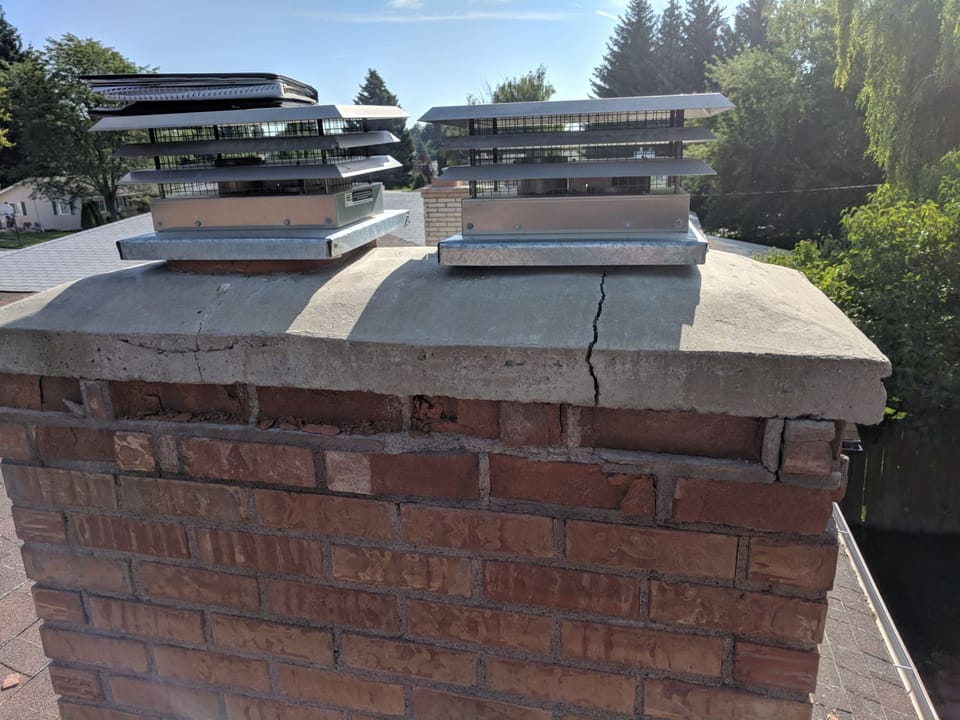
A heavy concrete chimney cap with a crack running clean through its edge, above spalled and broken brick, with two metal flue caps on top
Less than a year after this heavy cap went on, it's cracked clean through, and the spalled brick below it was never fixed.

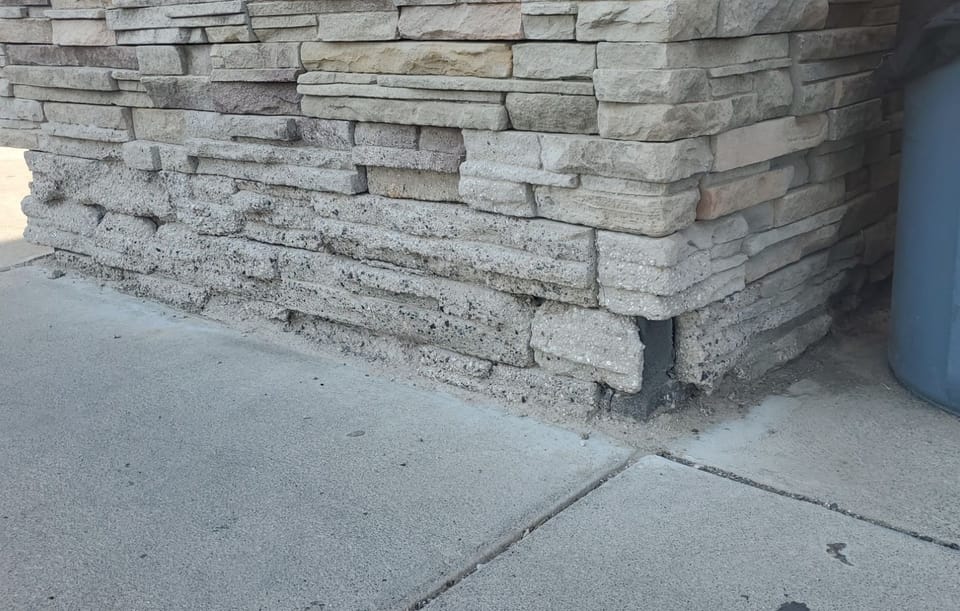
7. Manufactured stone run down to the dirt

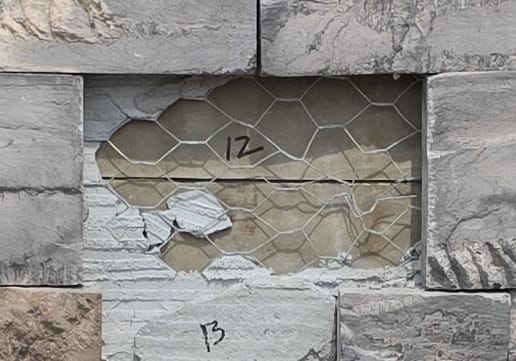
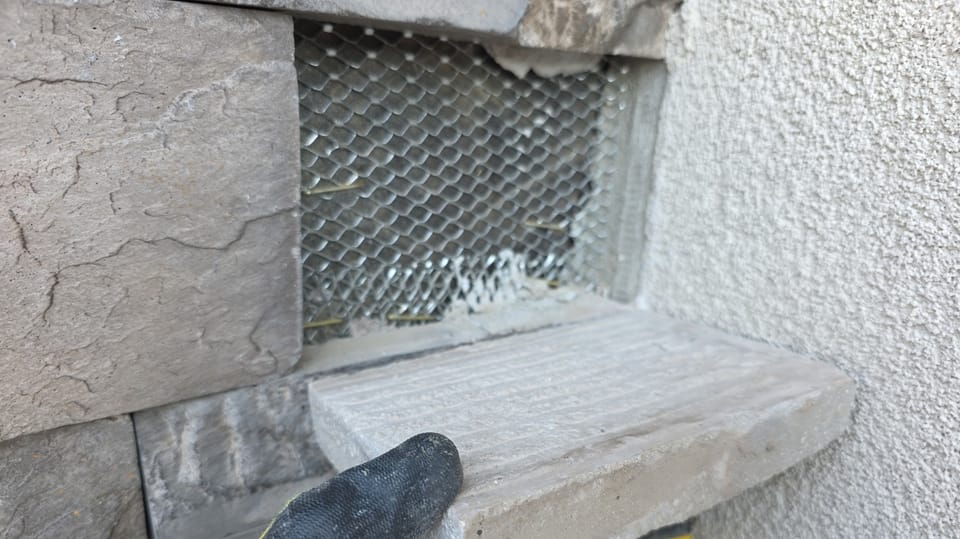
Manufactured stone is a thin veneer set in mortar over lath and a water barrier. When it's run right down into the dirt or onto the patio, water wicks up behind it and has nowhere to go.

What poor work looks like

  • Stone touching the soil, the mulch or the concrete at the bottom of the wall.
  • The bottom rows of stone crumbling and rotting away where they meet the ground.
  • Staining, white powder or loose stones along the bottom rows.
  • Soft, rotting sheathing and framing behind the bottom of the stone, too often found only once the stone comes off.

How it should be done

  • Clearance at the bottom: at least 4 inches above soil and at least 2 inches above paving. The Masonry Advisory Council lays out those building code clearances in Adhered Veneer: Code Requirements for Installation.
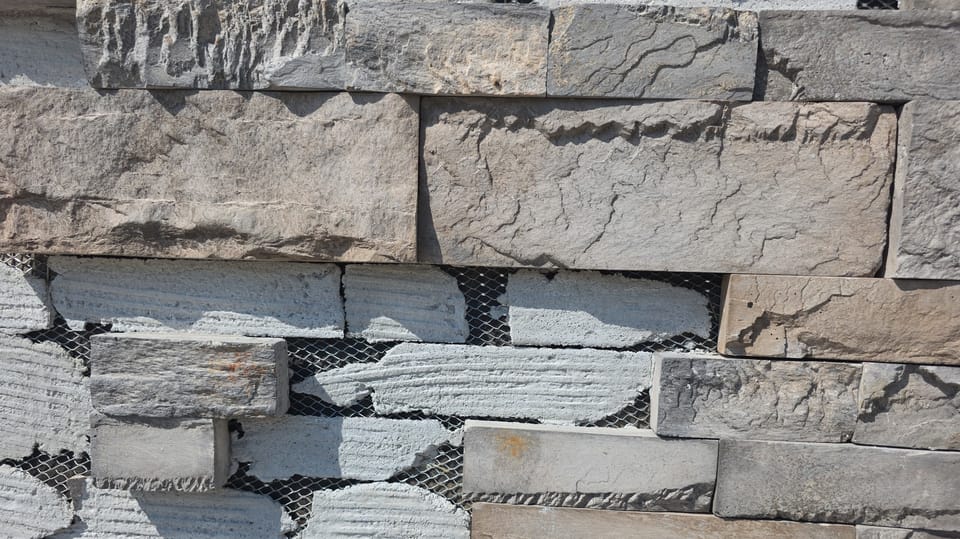
  • A water barrier, then diamond-mesh metal lath with its cups facing up, then a half-inch scratch coat of mortar that buries the lath. Any old siding comes off first. Stone doesn't go over vinyl siding.

Sources: Masonry Advisory Council, Adhered Veneer: Code Requirements for Installation

Manufactured stone veneer on a building corner, run right down to the sidewalk, with the bottom rows crumbling and rotting away
Manufactured stone run right down to the sidewalk, with the bottom rows rotting away.

9. Brick painted or coated with the wrong product

Brick has to breathe. Paint made for masonry lets the moisture in the brick dry out through it. Ordinary exterior paint seals the face instead, so the water stays in the brick, freezes, and pops the face right off.

What poor work looks like

  • Brick painted with ordinary exterior house paint instead of paint made for masonry. It's very common, usually by painters or homeowners who don't know there's a difference.
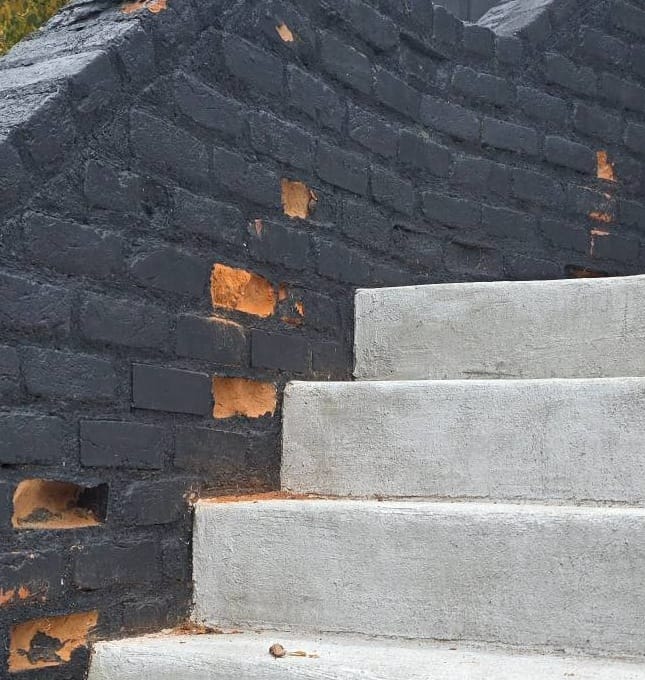
  • Patches where the face of the brick has popped off, showing raw brick under the paint.
  • Paint or a paint-on waterproofer peeling or bubbling, with white powder underneath.
  • Once brick has been painted with the wrong paint, it's ruined. The face keeps coming off, and the only real fix is tearing it down and building it again.

How it should be done

  • If brick gets painted at all, a breathable paint made for masonry, so moisture can still get out.
  • If the brick gets sealed, a breathable water repellent that lets it dry. The Brick Industry Association's Technical Notes 6A says not to put film-forming coatings on brick in freeze and thaw climates.
  • Find where the water is getting in and close it first. On a chimney that's usually the top or the joints.

Sources: Brick Industry Association, Technical Notes 6A

A brick stair wall painted black, with orange patches where the faces of many bricks have popped off under the paint
Brick painted with the wrong paint. Every orange patch is a spot where the face of the brick popped off under the black paint.

10. Masonry built without a proper footing or steel

Garden walls, planters, pillars, mailboxes and retaining walls look simple, so they're an easy place to cut corners. Skip the footing and the steel, and the structure starts to lean once the ground has frozen and thawed under it a few times.

What poor work looks like

  • A wall, planter, pillar, post or mailbox leaning or tipping over.
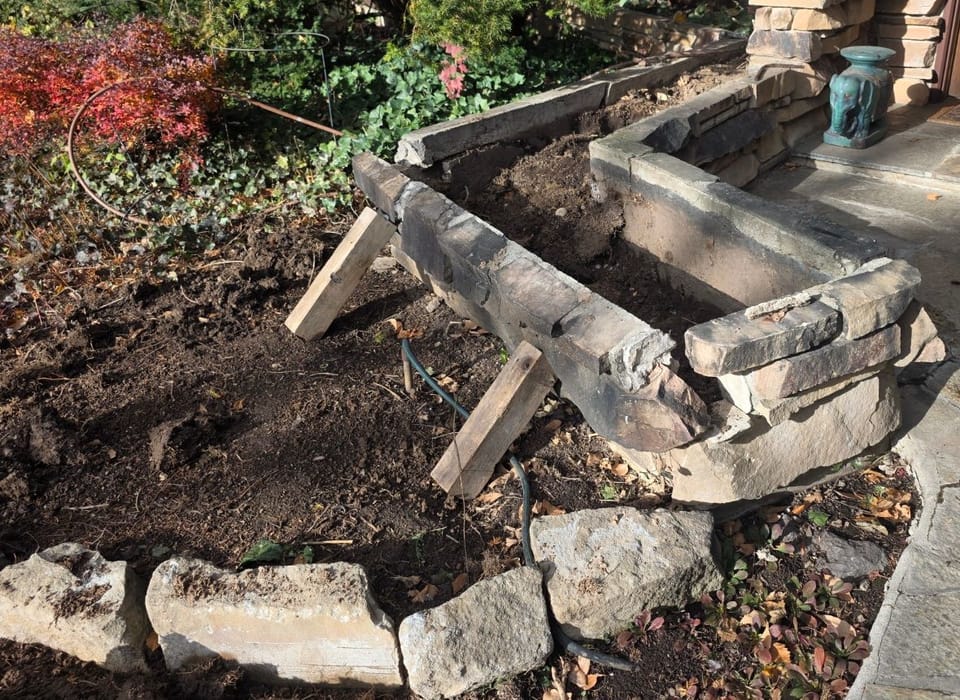
  • A wall propped up with boards to keep it from falling.
  • A crack running across the lower rows of brick, block or stone.
  • A gate post pulling away from its gate.

How it should be done

  • A proper footing under every freestanding wall, pillar and mailbox, below the frost line. In the Treasure Valley that's typically 24 inches, but it varies by city, so check with your local building department.
  • Rebar running up through the structure, tied into the footing.
  • A retaining wall footing built for the soil pushing on it, not just the weight of the wall. A thin slab poured for something else won't hold it.

More on this: Does a masonry wall, pillar, post, column, or mailbox need rebar and a proper footing? Does a masonry retaining wall need a deep footing?

A stone planter wall beside a front walk, tipped outward and propped up with wooden boards, with loose stones lying in the dirt in front of it
A stone wall built without a proper footing, tipping over and propped up with boards.

Is an Idaho contractor registration a license?

No. Idaho requires contractors to register with the Idaho Contractors Board, part of the Idaho Division of Occupational and Professional Licenses, for any construction job over two thousand dollars in labor and materials. In the Division's own words, the law requires registration, not licensure.

Registering takes proof of insurance and a statement of the type of construction the contractor does. There's no exam and no experience requirement.

That's exactly why references and experience matter. The registration tells you a contractor followed the law. References and years of real masonry work are how you find out who actually knows the trade.

How do I check a mason before I hire one?

Four checks, and none of them take long. A qualified mason will be glad you asked.

  1. Look up the registration number yourself. Use the Division's registration search, and make sure it's active and the name matches who you're hiring. Idaho requires that number on contracts and advertising, so it shouldn't be hard to get.
  2. Ask for references from jobs like yours. A new wall, a chimney repair and a stone front are different work, so ask for that kind. The Brick Industry Association's Technical Notes 46 says repointing should be done only by qualified, experienced craftspeople, and that an excellent mason may not be qualified for it.
  3. Ask how many years of masonry experience the person doing your work has. Not the company's years. The mason who will actually be on your job.
  4. Confirm insurance. Ask for a current certificate of liability insurance.

A chimney sweep offered to fix my masonry. What should I ask?

Too often, a chimney cleaning company adds masonry repair to the visit. A good sweep is worth having. Repointing and crown work are a different trade.

So ask who will actually do the masonry, and then ask about that person: their own registration number, references from masonry repair jobs, and how many years they've been doing it.

A cleaning company's registration shows the company followed the law. It doesn't show that the person doing the work can repoint a chimney. There's more on telling the two trades apart under Do I need a mason or a chimney sweep?

The same goes for anybody who learned masonry from videos. Watching a repair and doing one are not the same thing, and too often the homeowner pays for the difference twice.

Sources

Seeing one of these on your house?

Tell me about it and I'll take a look. Free quote, no obligation.

Get a Free Quote